Tutorial: Hello, world! Cinnamon desklet
This is the first of hopefully several tutorials on developing desklets for the Cinnamon desktop environment. In this tutorial, I will cover the basics of creating a desklet and do my best to link or refer to additional resources where you might find more information on the topics. Cinnamon is a linux desktop environment forked from Gnome Shell by Linux Mint. A desklet is a small application which appears on the Cinnamon desktop, Cinnamon ships with three desklets and more can be found here. Desklets are written in JavaScript and uses CJS which is based on Gjs. Gjs are JavaScript bindings for GNOME and is based on Mozilla's JavaScript engine Spidermonkey.
My reason for creating this tutorial came about when I was creating a desklet for Cinnamon. There were barely any guides or tutorials on creating a desklet and finding documentation on the libraries available in CJS was difficult. The only advice I saw was to read other people's source code and learn from that, while it is a great way to learn, it does not provide enough information. So I would like to share what I have learned and where I found it.
Our first desklet will be a simple "Hello, World!" program, a simple program which displays the text "Hello, World!" on the desktop using GNOME Shell's Clutter-based toolkit called St (Shell Toolkit). The St library provides an easy way to create simple user interfaces.
Requirements
- Cinnamon (I am running Linux Mint 17.1 with version 2.4.5)
- Your favorite text editor
Set up
Let's start by setting up the directory for our desklet. Desklets are stored in the user's home directory ~/.local/share/cinnamon/desklets, this is where we will work on our desklet. First, we need to create the directory of our desklet with a unique ID or UUID in the following format "desklet-name@name", where desklet-name is the desklet's name, in this case hello-world, and name is either your name or your domain name. I will use the UUID "hello-world@orangeshark".
mkdir -p ~/.local/share/cinnamon/desklets/hello-world@orangeshark
cd ~/.local/share/cinnamon/desklets/hello-world@orangeshark
Now we need to create the structure for our project. A desklet has the following structure:
hello-world@orangeshark/
├── desklet.js
└── metadata.json
The desklet.js file is where the majority of our JavaScript code will be located. metadata.json contains, of course, the metadata for the desklet, including the UUID and name of the desklet.
touch desklet.js metadata.jsonTime to code
Lets first define the metadata for the desklet, open up metadata.json and add the following json.
{
    "uuid": "hello-world@orangeshark",
    "name": "Hello, world! desklet",
    "description": "Displays Hello, World!",
    "prevent-decorations": false
}
The metadata contains basic information about your desklet, including the UUID we discussed earlier. The only special property is "prevent-decorations" which tells Cinnamon whether to apply your desktop's theme or prevent it from inheriting it. For this simple example, we will put the value false so the desklet looks like the rest of your desktop.
Now for the JavaScript. There are several coding style guides to follow for JavaScript by the GNOME project, Cinnamon seems to follow this guide. If you are used to using JavaScript on the web or in node.js, you might notice a couple of differences in the language. Several of these features are from Mozilla's version of JavaScript with some being defined in future versions of ECMAScript. I will provide links where you can find additional information on those features as we encounter them.
const Desklet = imports.ui.desklet;

function HelloDesklet(metadata, desklet_id) {
    this._init(metadata, desklet_id);
}

HelloDesklet.prototype = {
    __proto__: Desklet.Desklet.prototype,

    _init: function(metadata, desklet_id) {
        Desklet.Desklet.prototype._init.call(this, metadata, desklet_id);
    }
}

function main(metadata, desklet_id) {
    return new HelloDesklet(metadata, desklet_id);
}
The above code is all you need to create a minimal desklet. You can use it as the basic template to start your own desklet. Now for an explanation of each part! The first line contains const, one of those new features I mentioned earlier, more info here. The const declaration creates a constant in the current scope, in this case the global scope, with a value that cannot be changed through re-assignment. We use it here to import the desklet module from Cinnamon. The next function is our Desklet object's constructor, following GNOME's style guide for creating "classes". Using GNOME's class pattern, we assign to the prototype of HelloDesklet an object containing the methods and properties for our HelloDesklet class. The first property "__proto__" is a special one, it allows us to modify the prototype chain, allowing us to have a sort of inheritance of classes. So if a property is not found in the current instance, it will walk the prototype chain to the next prototype, in this case Desklet's prototype, and check if the property is there. So our desklet must "inherit" from Cinnamon's Desklet class, Desklet contains a lot of code required by Cinnamon to set up and destroy a desklet. The _init function is the actual constructor for our "class" and our first task is to call the Desklet's constructor, passing the current instance using "this". Finally the main function is the entry point to our desklet and we just return an instance of our desklet.
const Desklet = imports.ui.desklet;
const St = imports.gi.St;
function HelloDesklet(metadata, desklet_id) {
this._init(metadata, desklet_id);
}
HelloDesklet.prototype = {
__proto__: Desklet.Desklet.prototype,
_init: function(metadata, desklet_id) {
Desklet.Desklet.prototype._init.call(this, metadata, desklet_id);
this.setupUI();
},
setupUI: function() {
// main container for the desklet
this.window = new St.Bin();
this.text = new St.Label();
this.text.set_text("Hello, world!");
this.window.add_actor(this.text);
this.setContent(this.window);
}
}
function main(metadata, desklet_id) {
return new HelloDesklet(metadata, desklet_id);
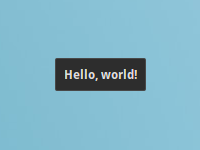
}We now import a new library, this time St or Shell Toolkit library from GNOME. I have found this documentation to be helpful in finding what classes are available in JavaScript over the GNOME's official C API reference. Next, a new method to HelloDesklet has been added which sets up our little window on the desktop and displays the text "Hello, world!". We use a StBin container that can contain a single child, which is a StLabel widget with the text "Hello, world!". Finally we add the label to the window with the add_actor method and then set the desklet content with setContent method inherited from the Desklet base class. That is it! We have finished the basis of a simple desklet for Cinnamon. It should look something like what you see below (the style might be different depending on your Cinnamon theme).
This concludes the tutorial for Cinnamon desklets. I plan on covering more aspects on creating Cinnamon desklets in the future, so stay tuned!
